How best to structure our color grading services here at FilmFix presented us with a dilemma. On the one hand, all 8mm film benefits from some color grading, so that the transfer looks natural on your TV. On the other hand, the price of our full, in-depth grade (we call it “The Swiss Finish”) can be prohibitive for some of our customers. Color grading is — always and unconditionally — laborious. For the sake of our customers, we had to find a way to make it more affordable in the smartest way possible. This is where the 80/20 Rule came to the rescue.
Before we get to the 80/20 Rule and how we applied it to reduce the cost of color grading for you, we need to explain what it takes to color grade 8mm film, and why it normally costs so much.
What color grading corrects
By way of example — without showing you the film’s image — here is a screen capture of how a strongly discolored film displays in a videoscope. (The videoscope — waveform and vectorscope — is the instrument we use to inspect the image we are working on.) This particular clip had a strong magenta discoloration.
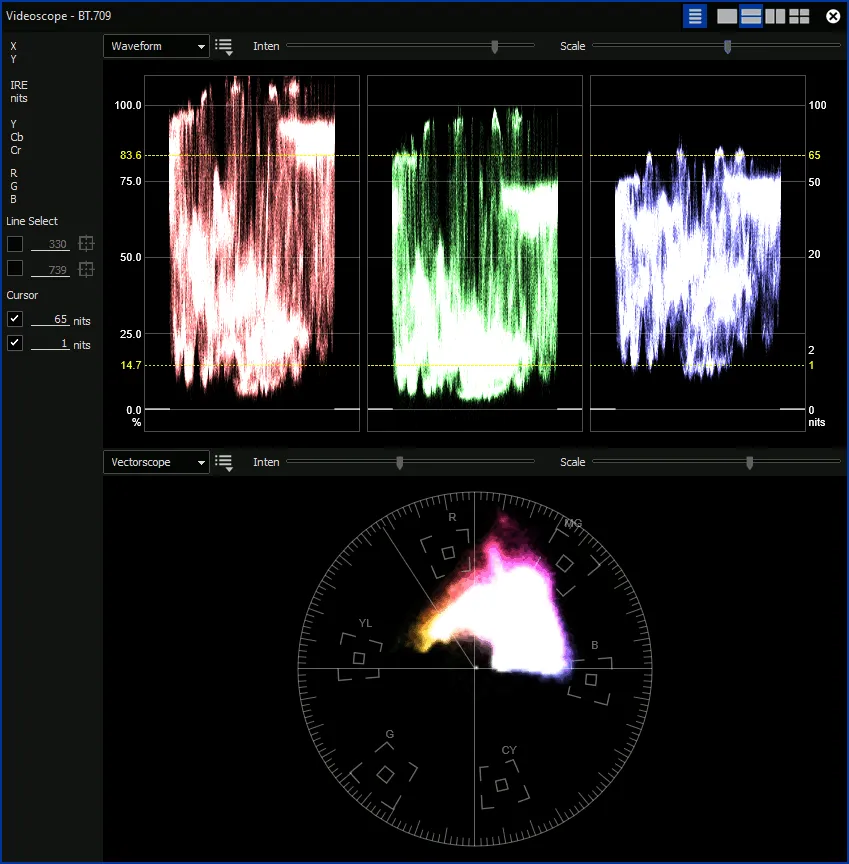
You do not need to read this instrument the way we do. Just notice that the red waveform on the top left is much taller than the blue waveform on the top right. The capture below shows the same clip after color grading:
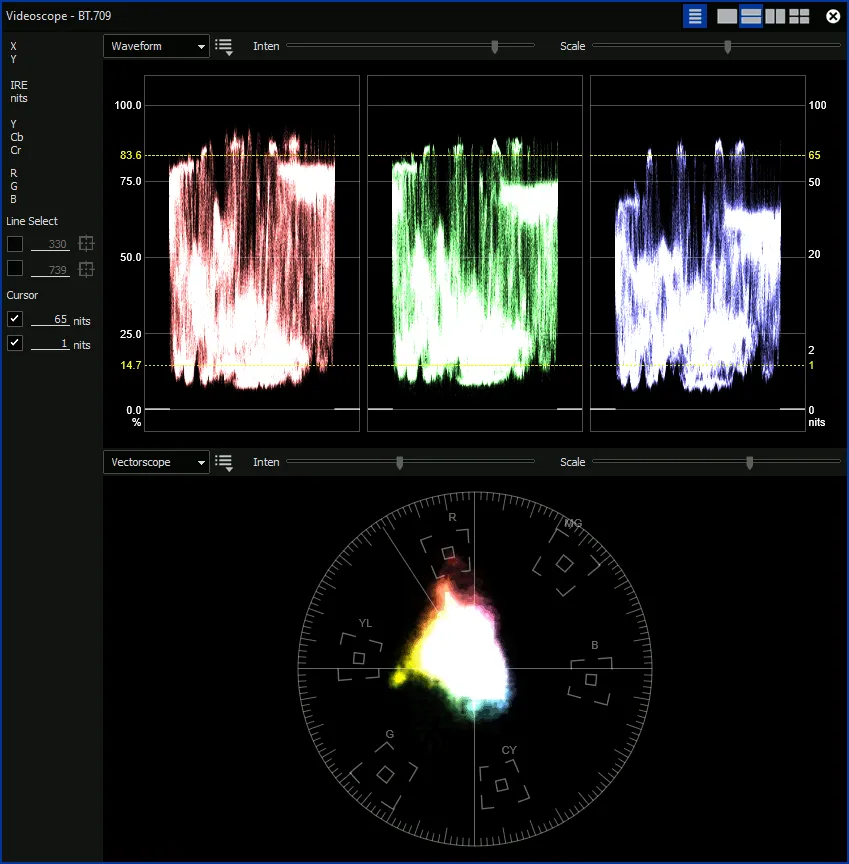
In all three color waveforms, the high points and the low points are now relatively even, with adequate margins separating them from both the 0-mark and the 100-mark. Those margins matter because a TV and a computer do not treat the same MP4 file alike. A computer knows what to do with brightness above the 100-mark, the so-called “Super-Whites”, and below the 0-mark: it still shows them. A television does not. Whatever lies outside the two marks is “clipped”: the brightest parts bloom out to plain white, the darkest sink to plain black, and the detail in them is gone. Keeping the picture inside the marks preserves the detail in both shadows and highlights, on whichever screen you watch.
The three adjustments behind that result
Whatever software is used, getting from the first capture to the second takes the same three adjustments:
- Balance the midtones.
The gray balance is where a color cast shows most. Here, the film’s magenta shift was neutralized by adding green to the grays, and the red component was moved toward a more natural-looking red. - Set contrast and saturation for the screen.
The contrast was lowered into a TV-friendly range, and a little color saturation was added back. - Balance the blacks and the whites.
Shadows and highlights fade differently from the midtones, so they get their own correction. This fine-tunes the colors in the black, gray, and white regions separately.
Color correction takes many fine adjustments, and a trained and experienced eye, to get each scene right.
At the bench
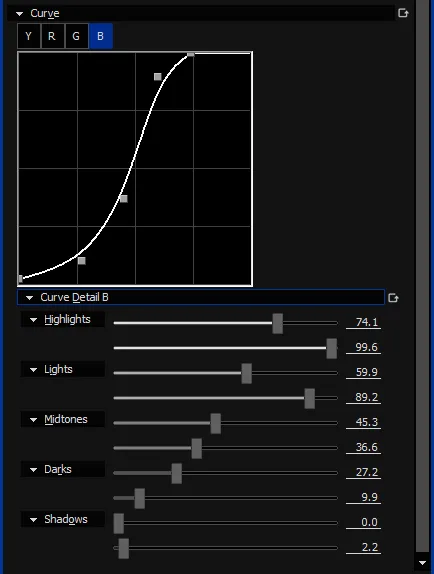
In our California lab, all three adjustments are made in one panel, the Primary Color Correction tool of the Edius video editor. “Lift”, “Gamma” and “Gain” are the shadows, the midtones and the highlights, each with its own brightness (Y) and red, green and blue controls and a color wheel. Below them sit the saturation and the contrast curve.
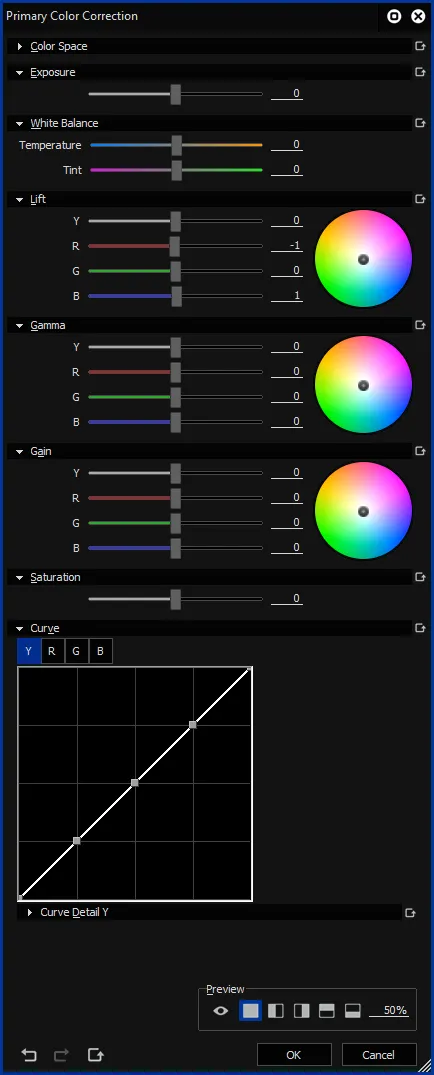
Here is the same panel at work, set to correct a film that has lost its yellow. Color film is built in layers: a clear base, and on top of it the dye layers that make up the colors, one upon the other. The yellow layer is the last one, the outermost. It is the layer exposed to the air and the elements, and over the decades it can lose a great deal of its pigment. With the yellow gone, the picture drifts toward blue and magenta. The correction puts the missing yellow back, separately for the shadows, the midtones and the highlights, because the three have not faded by the same amount.
Our Swiss lab works in DaVinci Resolve and Adobe Premiere. The tools differ; the steps, and the judgment they call for, are the same.
Why not let the software do it?
Editing software now offers automatic color correction, and we are often asked why we do not simply use it.
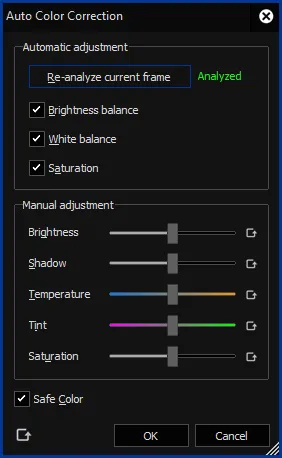
An automatic tool analyzes a single frame and applies one overall brightness, white balance and saturation setting. For a modern video that is often enough. For old film it is not: faded film is not shifted evenly. A magenta cast sits differently in the shadows than in the highlights, and an automatic tool has no separate control of shadows, midtones and highlights, and no contrast curve, to follow it. A setting that suits the analyzed frame is also wrong for the next scene, which was shot in different light. The refinements that make the difference are exactly the ones such a tool cannot make, so the work stays manual.
What color grading is used for
When preparing a transfer for color grading, we start by spotting where along the film color adjustments are needed. Color grading is used to:
- Address color shifts due to film degradation
(In the example above, lost yellow and green made the film look magenta.) - Address color shifts due to the wrong type of film
(For example, the camera operator might have used indoor film outdoors, or vice-versa.) - Apply artistic effects
(We do not generally apply artistic effects to color film; but when color grading Black-&-White film we might, for example, add some warming effect.) - Optimize the transfer for TV
(As explained above, a television clips what a computer still shows. In general, televisions have a narrower contrast range than computers do, just as computers have a narrower contrast range than film does. Fitting the film’s contrast into the range a TV can display has to be anticipated and addressed at this final stage of a film transfer.) - Compensate for exposure problems
(The camera operator might have over- or under-exposed the film.) - Combine any of the above
(Whatever mix of these adjustments gives your transfer its best color.)
Addressing items #1 and #2 has a big impact without excessive effort and time. In particular, item #1 only requires one setting per small 3-inch reel (50 ft / 15 m).
Item #4 is essential as well, since you will most likely be playing our film transfers on your TV. For this reason alone, every transfer should get at least some minor color grading.
Items #1 and #2 are strongly linked, as both address unwanted color shifts in the film. Items #4 and #5 are linked in the same way, since both address exposure. These links come into play when we apply the 80/20 Rule.
Where the time goes
What the list above does not show is how often along a reel one or more of these adjustments has to be made anew. This is where the time — and the cost to you — can soar, depending on the condition of your film. We could copy-and-paste presets to save time, but that would give your transfer a poor color grade. The following excerpt from an editing timeline shows how often a new adjustment is typically needed during a film transfer:
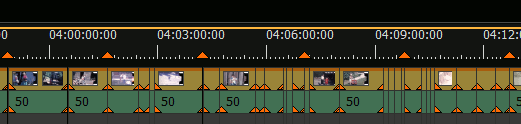
The top section has six orange triangle markers, each marking the start of a new 3-inch reel. An orange marker occurs about every 3:40 minutes.

The gold strip is the film’s image. (The green strip is the sound track.) Each vertical black line along the gold strip marks where a new color adjustment was set.

As this example shows, color grading at FilmFix is far from an automated process. It is highly labor-intensive, with many experience-driven decisions made scene by scene. Put another way: we fit the color grading of each and every transfer to the condition of that particular film.
In fact, the example above shows relatively few transitions per minute compared to badly deteriorated film. Old film often needs much denser re-sets to produce the highest quality transfer. This happens most with the older Normal 8 format, because those cameras had no exposure assistance, and because people filmed economically and avoided longer takes. Film was expensive!
The 80/20 Rule
With that foundation laid, we can get to the subject of this article: what is the 80/20 Rule, and how does it help?
Samuel Blume — a close childhood friend of FilmFix’s founder, and a programmer at heart — introduced us to it. The 80/20 Rule (also known as the Pareto Principle) can be applied to many things.
The rule states: “It takes 20% of the effort to get 80% done, and another 80% of the effort to complete the remaining 20% of the work.” You can see how it applies to deep-cleaning a messy room. Like Murphy’s Law, the Pareto Principle has many corollaries and variations, but the overall concept holds true for color grading film transfers.
When applying the 80/20 Rule to color grading, we focus on items #1 (correcting for film degradation), #2 (compensating for the wrong type of film), #3 (artistic filters for B&W film), and #4 (optimizing for TV) from the list above. Confining ourselves to those four objectives significantly reduces the number of adjustments needed.
(Item #5 — exposure correction — is the final 20% of the color grading process that demands the extra 80% of the time! The reason gets a bit technical, but here is the good news: the #4 adjustment often takes care of many exposure problems along the way, without the scene-by-scene work that custom exposure correction entails.)
This shortens the time spent on each project, while still getting 80% of the way to the highest-quality color grading possible. It does not yield the perfect result that the far more expensive process does, but it gives you a very good — and far more affordable — outcome. By leaving out the last, most time-consuming 20% of the process, we save you 80% of the cost: the 80/20 grade costs 20% of what The Swiss Finish costs.
Please note: the 80/20 grade works well when each 50 ft (15 m) of film is one film stock. That is the case for small 3-inch reels, and for large reels made of 50 ft reels spliced together. With the 80/20 grade we limit ourselves to one or two corrections per 50 ft. If your large reels hold edited film, with short clips from different film stocks, The Swiss Finish will serve you better.
Please keep in mind that we do not need to apply the 80/20 Rule to your film transfer: we can give you the full treatment! We always aim for perfection. Let us know if you want The Swiss Finish applied to your film transfers.
A 10-bit file keeps your options open
If you choose the 80/20 grade, please consider ordering more than an MP4 file. An MP4 file is an 8-bit file. We recommend that you also let us provide a 10-bit file (ProRes 422 HQ). That way, any color grading done in the future will have a better outcome. The following illustration compares an 8-bit with a 10-bit file. The 10-bit file has many more available colors, which allows for a significantly smoother gradient:


Summary
Here at FilmFix, we offer two options for color grading your film transfers, to suit your budget and your quality requirements. The best quality color grading takes a lot of extra time, and therefore costs significantly more than our more economical option. By judicious application of a principle known as the 80/20 Rule (which, incidentally, has relevance in many aspects of life!), we have devised a color grading method that delivers 80% of the top-quality result for 20% of its cost.
And if you would like your film transfer with top-quality color grading, The Swiss Finish, we can provide it. Moreover, we love to do it, because we are perfectionists!